Showing posts with label arduino. Show all posts

06 June 2015

The Double-A XBee Sensor Node

This is my design for an Arduino-compatible (ATmega328P), low-power sensor node using an XBee ZB module. This node can operate as part of the GroveStreams Wireless Sensor Network that I described in my previous post. I call it the Double-A XBee Sensor Node since it runs on a pair of AA cells.

Although I haven't done a lot of testing, I believe it should run for over a year on a pair of AA alkaline cells. This will be affected by the power requirements of additional sensors, supply voltage (either 3.3V or 5V can be selected) and data transmission frequency. The basic board with no additional sensors draws less than 5µA while sleeping.

The AA XBee Node includes an accurate real-time clock (DS3231, ±2ppm from 0°C to +40°C) for precise timing of data transmissions and an accurate on-board I2C temperature sensor (MCP9808, ±0.25°C typical). A prototyping area is provided for connecting additional sensors. Twelve microcontroller GPIO pins are available to interface with sensors, including the I2C and SPI buses and analog inputs. A pushbutton switch and an LED are available for application use if needed.

For more information

The Double-A XBee Sensor Node is an open-source project. For complete information on the circuit design, including Eagle files, configuration options, programming requirements, etc. see the GitHub repository.

For an example sketch, see the aaXBee sketch which is part of my GroveStreams library. Using this sketch, the AA XBee Node sends data to an Arduino running the gsGateway sketch, which forwards it to the GroveStreams web site.

19 May 2015

A GroveStreams Wireless Sensor Network

In this post I describe how to build an XBee-based wireless sensor network that feeds data to the GroveStreams Data Analytics Platform. I've been using GroveStreams for a couple years now and I am very impressed. The GroveStreams platform has features and power far beyond other "IoT" data services that I have tried. Perhaps even more impressive is how eager the GroveStreams team is to work with their users. User input frequently results in improvements to the platform, and usually quite rapidly at that. GroveStreams delivers a great service, great performance, and they are intensely focused on their customers.

GroveStreams accounts are free, up to certain levels of utilization; above this, rates seem quite reasonable. See the site for details.

This project consists of two network nodes, connected by a ZigBee mesh network implemented with XBee ZB modules (f.k.a. Series 2). One node is the web gateway. Its XBee is configured as the network coordinator. The gateway forwards data sent to it by other nodes to the GroveStreams service via an Ethernet shield.

The other node is a sensor node; its XBee is configured as a router. This node uses a simple analog temperature sensor and sends the data to GroveStreams via the gateway node. Multiple copies of the sensor node are easily added to the network. These can have the same sensor, or with additional programming, other sensors could be added.

Hardware required for this project

(2) Arduino Uno boards
(1) Arduino Ethernet shield
(2) XBee ZB modules (I use part no. XB24-Z7WIT-004 with the wire antenna)
(2) Adafruit XBee Adapter kits
(1) Adafruit FTDI Friend (used to configure the XBees with XCTU)
(1) USB A Male to Mini B cable to connect the FTDI friend to a computer
(2) Yellow LEDs (use any common 3mm or 5mm LED)
(2) Red LEDs (ditto)
(4) 330-ohm resistors (anything between 220 ohms and 1000 ohms should be OK)
(1) 100nF ceramic capacitor
(1) Analog Devices TMP36 temperature sensor
Breadboards, jumper wires, USB and Ethernet cables, power supplies, etc.

Step-by-step instructions

  1. Build the Gateway and Sensor nodes per the schematic diagram.

Gateway Node

Sensor Node
  1. Download and install the XBee Configuration and Test Utility software (XCTU) from digi.com (version 6.2.0 is current as of this writing).
  2. If you have not used FTDI on your computer before, install the FTDI drivers.
  3. Install one XBee in an Adafruit XBee adapter. Using the FTDI Friend, connect it to the computer with a USB A-to-Mini-B cable.
Configuring an XBee with Adafruit's FTDI Friend
  1. Download the latest Coordinator API firmware (21A7 as of this writing) to the XBee. Then, configure the ID, NI, BD, and AP parameters as described in the gsGateway example sketch. (The PAN ID can be any number you like; all XBees on the same network must have the same PAN ID. However, I do recommend a non-zero value.)
  2. Repeat with the other XBee, except download the latest Router API firmware (23A7 as of this writing) and set the four parameters as described in the gsSensor example sketch.
  3. Install the Coordinator XBee in the Gateway node and the Router XBee in the Sensor node.
  4. On both the Gateway and Sensor nodes, temporarily disconnect Arduino Pin 0 from the XBee to allow programming. (Since the XBee connects to the Arduino's serial port, it must be disconnected from the RXD pin to allow the Arduino to be programmed via the bootloader.)
  5. Now go to the GroveStreams web site and create an account. This involves a verification email which should be a familiar process. Once the account is verified, log in and you should see the following message that offers to create an Organization.
After initial GroveStreams Sign-In

Let's digress here for a very quick and incomplete primer on some GroveStreams terminology. An Organization is a container for one or more Components. A Component can represent a physical object in the real world. For this project, the Gateway node will be one Component and the Sensor node will be another. Components in turn contain one or more Datastreams, which contain the actual data sent to the GroveStreams site, for example by our sensor. Keep these concepts in mind for now and we'll see how it all fits together shortly.
  1. Continuing on, respond to the message by clicking Yes to create an Organization. Give it any name you like, then click the Create Organization button.
Creating an Organization
  1. Now we see the GroveStreams start page which lists our Organizations, of which there should be only one, namely the one we just created.
GroveStreams Start Page
  1. Click on the Organization name to open the GroveStreams Observation Studio, which is the main interface to configuring and observing everything in GroveStreams. On the left, note there is a folder for Components, but if the little triangle is clicked, the folder doesn't expand, since no components have been created yet. We can create Components from Observation Studio, but GroveStreams also has a handy feature to create Components automatically when data is first received. Being mostly lazy, we'll use that method for this project.
GroveStreams Observation Studio
  1. Next click on the yellow lock "API Keys" icon near the top right. This will open a dialog that allows keys to be displayed. Our Gateway node needs a key so that GroveStreams can validate it and associate the incoming data with our Organization. Check the box, "Feed Put API Key (with auto-registration and request stream rights)", then click View Secret Key.
API Keys Dialog
  1. In the dialog box that appears, use the mouse to select the key. Press Ctrl-C to copy it to the clipboard, then open Notepad or other convenient application and press Ctrl-V to paste the key. We'll use it shortly, but for now just close the API Secret Key dialog box and the API Keys dialog box.
  2. We are almost ready to program the Gateway and Sensor nodes. But first we need to install the prerequisite libraries. If you are not familiar with installing libraries, please click this link.

    Install each of these libraries:

    http://github.com/JChristensen/GroveStreams
    This library manages the connection to the GroveStreams web site, allows data to be sent, etc.

    http://github.com/JChristensen/gsXBee
    This library handles interface to the XBees.

    http://github.com/andrewrapp/xbee-arduino
    An essential library for working with XBees in API mode.

    http://arduiniana.org/libraries/streaming/
    A very convenient alternative to Serial.print(). (I don't know why it's not part of the Arduino core.)
  3. Start the Arduino IDE and open the gsGateway example sketch from the GroveStreams library (File > Examples > GroveStreams > gsGateway). Change this line of code by pasting in the API key that was copied earlier. (You may also want to change the MAC address on the following line, but chances are that the existing one will work fine.)
  4. Upload the modified gsGateway sketch to the Gateway node. Disconnect the Gateway node. Reconnect Pin 0 to the XBee.
  5. Open the gsSensor example sketch (File > Examples > GroveStreams > gsSensor) and upload it to the Sensor node. No code changes are needed. Disconnect the Sensor node. Reconnect Pin 0 to the XBee.
  6. Connect the Gateway node to your LAN with an Ethernet cable. Apply power to the Arduino. After several seconds, the red wait LED should blink once and the yellow heartbeat LED should begin blinking on and off. Upon startup or reset, the Gateway sends a single message to GroveStreams. Go to the GroveStreams Observation Studio and there should now be a Component named "Coord" created for the Gateway/Coordinator node. This may take several seconds; if you don't see it, try refreshing the web page. Expand the Coord Component and one datastream named "msg" should be visible. This is the startup message sent by the Gateway.
Coord Component created, Startup message sent
  1.  Connect power to the Sensor node. The first data will be sent in one minute, then at one minute intervals thereafter. Wait at least a minute, then refresh the Observation Studio web page and the Sensor node should now be visible as Component "TMP36a". It has three datastreams: "s" which is a sequence number, "C" which is the temperature in Celsius, and "rss" which is the received signal strength at the Gateway XBee. ("rss" is added by the Gateway node. Note that in larger XBee networks, several hops may occur between source and destination nodes. The RSS value only represents that of the last hop.)
TMP36a Sensor Component created

Both nodes write diagnostic information to the serial port; open the Arduino serial monitor or other terminal program at 115,200 baud to observe this information.

Concluding remarks

This has been a long post but it's basically a cookbook approach and only scratches the surface. I hope it will be a starting point for further exploration into both GroveStreams and wireless sensor networks. GroveStreams has much more functionality than I have mentioned so far. Dashboards can display and aggregate data in many different ways, events can be defined to key off certain data values and cause various alerts to be sent, and derived streams can perform various calculations on data. For instance, GroveStreams can easily convert the temperature data sent by the Sensor node from Celsius to Fahrenheit; it would not be necessary to do this in the microcontroller firmware.

I also have not elaborated on the XBee node naming convention. The XBee Node Identifiers (NI) need to start with a one- to eight-character name. This name is used as the GroveStreams Component ID. The name is followed by an underscore character, then eight digits. The eight digits comprise four numbers that control the timing and frequency of data transmission. In this relatively simple project, even though the code for the Gateway node does not use any of these numbers, and the Sensor node only uses the interval, the naming convention still needs to be followed.

One advantage of the naming convention is that it allows identical sensor nodes to be deployed without having to change the microcontroller code. Only the XBee NI parameter needs to be changed. See the comments in the gsXBee.h file for a more complete description of the naming convention.

More to come

I'll be following up with a future post about another project that builds on this one: A battery-powered sensor node. Using two AA cells, it should run for at least a year, taking advantage of the low-power sleep modes of both the ATmega328P microcontroller and the XBee. So stay tuned for that.


24 September 2012

Simple XBee ZB (Series 2) P2P Communications

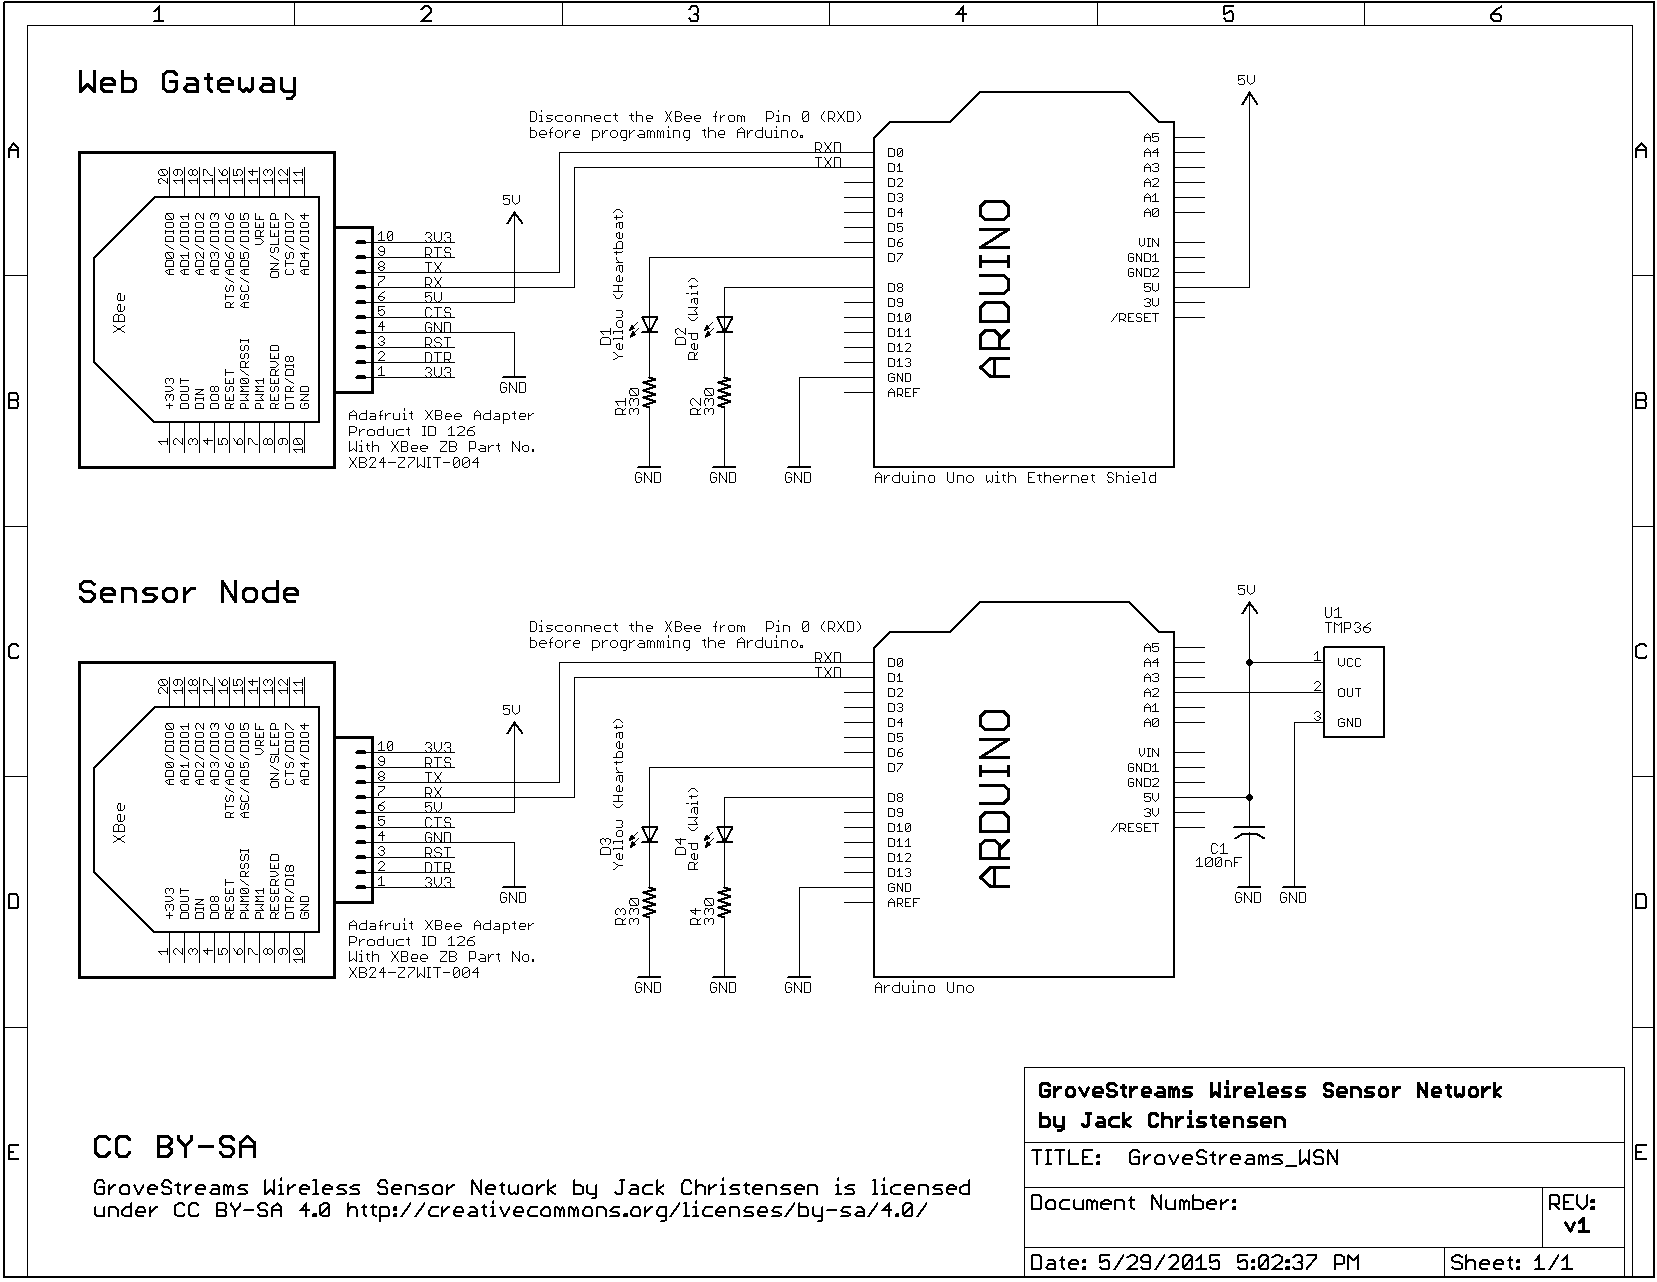
Some folks have difficulty using the XBee Series 2 modules (now called XBee ZB) for simple point-to-point communication in transparent (AT) mode. For this reason, the XBee Series 1 modules (now called XBee 802.15.4) are often recommended for simple P2P applications, with the S2 modules being considered "too complicated".

I disagree with this recommendation because the XBee ZB modules are more capable (and are perfectly capable of simple P2P communication), their radios are a little better than the XBee 802.15.4 modules (both in transmitter power and receiver sensitivity) and they even cost a couple bucks less. With a pair of ZB modules, if you ever want to try mesh networking with three or more nodes, there's nothing else you need to do (except to buy more modules).

The downside is that the XBee ZB modules do require some configuration to establish a P2P link. (I have not experimented with the XBee 802.15.4 modules myself, and I have heard conflicting stories regarding whether a pair can be used as a P2P link "out of the box" without further configuration.)

Getting to the point, I was discussing an XBee ZB issue on the Arduino forum the other day, when I hit on what I think is the minimal amount of configuration required to establish a point-to-point, transparent mode (AT) link with two brand-new XBee ZB modules right out of the box.

First, two assumptions. One, we assume that the modules come from the factory with the Router AT firmware loaded. I think this is a pretty good assumption, all the ZB modules that I have came this way (and BTW, the interface speed is set to 9600 baud). Two, we assume that there are no other XBee networks operating nearby. This is probably a good assumption for folks with their first pair of XBees, but more on that later in case it's not a good assumption for you.

It turns out that there is only one step required to get the new pair of XBee ZBs talking! Using Digi's X-CTU program, load the Coordinator AT firmware on one of the two modules. (Every XBee ZB network needs to have exactly one coordinator, so the first thing when setting up a network is to satisfy this basic requirement anyway.)

This works because the modules' default value of zero for the network ID (PAN ID) causes the coordinator to select a random PAN ID and causes the router to join any PAN ID available. Hence there is a potential issue if there is already another XBee network operating, the router may join it instead of talking to the new coordinator. If this is the case, then there is an additional step: The PAN ID for both units needs to be set to some non-zero value different from that of the other network(s). I like to always set the PAN ID anyway, since what passes for normal around here seems to be a minimum of two separate XBee ZB networks in simultaneous operation, but if you just have that first pair of modules, then more than likely you don't have to worry about it (unless your neighbor hasn't come out of the closet about his XBee addiction).

The other thing that makes this work is that the default destination address (DH and DL parameters) will be zero for the router and 0x000000000000FFFF for the coordinator. Zero is a special address that causes the router to send its traffic to the coordinator. 0x000000000000FFFF is also a special address called the broadcast address. This means that the coordinator will send to every other node on the network.

To broadcast or not to broadcast

As it turns out, using the broadcast address is OK for a simple demonstration with two nodes, but in general, broadcast transmissions should be used sparingly because they cause a lot of network overhead, and this can be significant on larger networks. In the case of two nodes, it's easy enough to avoid and just have the coordinator address its traffic directly to the router. First determine the router's 64-bit (16 hex digit) address. In X-CTU, it's the SH (Serial number High) and SL (Serial number Low) parameters. It's also printed on the label on the bottom of each XBee. SH and SL are each 8 hex digits, and the high part will always be 0x0013A200 for XBees made by Digi International. The low part will be a unique number, for instance 0x406B85A5. Next, connect the coordinator to X-CTU and set its Destination address High (DH) and Destination address Low (DL) to be the router's address. This will cause all transmissions from the coordinator to be unicast transmissions rather than broadcast, and to be directed to the router.

Well this post ended up a bit longer than I thought it would. I hope you stuck in there, and I hope it was useful. I hope to expand on this in another post at a later date, with more details regarding loading firmware, setting parameters, and connecting the XBees, but I wanted to get the thought out there for now. Happy networking!

14 September 2012

Yet Another Real-Time Clock

Real-Time Clocks (RTCs) are popular add-ons to microcontroller projects. I am no exception, I have a lot of them kicking around. The most common RTC seems to be the Maxim DS1307. A lot of my RTCs are DS1307s. It's a real workhorse chip, and easy to use. Still, it has disappointed me in a couple ways. For one, it's not always as accurate as I would like. I've used inexpensive no-name crystals and I've used more expensive ones from the top-shelf distributors. Sometimes they don't even seem to operate within the crystal's specs (typically ±20ppm). Not sure why this is, and it certainly could be my fault, but there it is. Another thing is that sometimes I have a 3.3V microcontroller circuit, but the DS1307 requires 5V.

Another alternative is the Maxim DS3231 (or its SPI relative, the DS3234). I love this chip, it is so cool. The integrated, temperature-compensated crystal makes it very accurate (±2ppm from 0°C to +40°C), and it will operate on 3.3V. This addresses all of my gripes with the DS1307. But it is more expensive, nearly $9 from Mouser in single quantities as I write this, where the DS1307 is about half that. (Yes, I know DS1307s can be had for significantly less from other sources.) But the DS3231 is harder to find at discount prices, and is only available in a surface-mount package if that makes a difference to you.

Enter the Microchip MCP79412. It operates off a crystal similar to that used by the DS1307, so the basic accuracy is about the same. But, it can be calibrated by setting an internal register. It will operate down to 1.8V. And while it does require a few more external passive components than the DS1307, it costs only $1.23 in single quantities. I popped for ten and paid $0.98 per copy. Again, it is only available as a surface-mount component.

The MCP79412 has some other cool tricks up its sleeve as well, including alarms, tracking power outages, and EEPROM in addition to SRAM. I've detailed these in the table below.

To summarize, I've been tinkering with the MCP79412 on and off for the last couple months and have come to like it quite well. I designed a breakout board for it (pictures below) and wrote an Arduino library to support it. I've only used three of the ten chips so far, but they have all operated well within the ±20ppm spec of the crystal I chose. One unit seems to be within 2ppm, and so hardly needs trimming.

If you are also using this chip, or would be interested in it, I'd love to hear from you!

PS: For a comprehensive example using the MCP79412, see my Power Outage Logger project.

Real-Time Clock Comparison
Feature MCP79412 DS1307
On-Chip Calibration ±127 ppm N/A
Alarms Dual alarms (single output) N/A
Power Fail/Restore Timestamps Yes N/A
Unique ID 64-bit ID N/A
EEPROM 128 bytes N/A
Battery-Backed SRAM 64 bytes 56 bytes
Vcc 1.8 - 5.5V 4.5 - 5.5V
I2C Interface Clock Frequency 400 kHz (Vcc ≥ 2.5V) 100 kHz
Square-Wave Output 1, 4096, 8192 or 32,768 Hz 1, 4096, 8192 or 32,768 Hz


MCP79412 RTC Breakout Board, Top
MCP79412 RTC Breakout Board, Bottom

04 September 2012

Warning! One Million Ohms

An electronic version of an old joke known among physicists and engineers.


Amuse your friends and confuse your enemies! Keep the uninitiated away from your workbench or desk and out of your lab!
  • Great conversation piece or gag gift
  • Big, scary 1,000,000 Ω resistor in the middle of the board
  • Pre-programmed AVR microcontroller (ATtiny85)
  • Arduino-compatible, hackable open-source hardware and software Can be re-programmed with an ICSP programmer, using either the Arduino integrated development environment or WinAVR
  • Runs on two AA batteries (not included)
Pressing the SELECT button turns the circuit on and causes the red LEDs to flash. To change the flashing speed and pattern, press SELECT again. Hold SELECT down to turn the circuit off, or it will automatically turn itself off after five minutes.

17 March 2012

Arduino Timezone and DST Library

The Timezone library facilitates time zone conversions and automatic daylight saving (summer) time adjustments. This is accomplished by setting a Real Time Clock (RTC) to Universal Coordinated Time (UTC) and then converting UTC to the correct local time, whether it is daylight saving time (a.k.a. summer time) or standard time.

The Timezone library is designed to work in conjunction with the Arduino Time library at http://www.arduino.cc/playground/Code/Time. To download and use the Timezone library, including documentation and example sketches:


  • Go to https://github.com/JChristensen/Timezone/downloads and download the file in the compressed format of your choice (zip or tar.gz) to a convenient location on your PC.
  • Uncompress the downloaded file. This will result in a folder containing all the files for the library, that has a name similar to "JChristensen-Timezone-42e98a7".
  • Rename the folder to just "Timezone".
  • Copy the renamed folder to the Arduino sketchbook\libraries folder.
  • Read the ReadMe.txt file!
  • 06 September 2011

    Arduino “Breadboard Helpers”


    I think that everyone should breadboard an Arduino at least once (one approach here, another here). It’s a great learning experience that does a lot to de-mystify all that circuitry, or perhaps more correctly, it shows just how simple “all that circuitry” can really be.

    For many projects, using breadboards makes a lot of sense to me. But after three or four times, it gets pretty repetitious, not to mention time-consuming and error-prone, putting all the basic wiring in place for the MCU.  I especially hate the FTDI and ICSP programming headers. My memory being what it is, I always have to refer to some cheat sheet to figure out all six connections for each!

    I had the idea of using a pair of small breakout boards to make the repetitious part easier and allow me to get to the interesting part of the project sooner.  One board provides the FTDI header and the other provides the ICSP header.  I call them “Breadboard Helpers” (with apologies to Hamburger Helper ™).  With the first version of the boards, I concentrated mostly on the programming headers, although I added a reset button to the FTDI board and the Arduino “Pin 13” LED to the ICSP board.

    Then I thought that I could expand the idea a bit and make things even easier.  So the second versions of the boards have the following features:

    FTDI Breadboard Helper

    ICSP Breadboard Helper
    • ICSP programming header
    • Arduino “Pin 13” LED and current-limiting resistor
    • AVcc bypass capacitor
    • Power supply bypass and filter capacitors
    • MCU power and ground connections
    • Under ¾ square inch

    With Breadboard Helpers, I can literally breadboard an Arduino in less than a minute.  I don’t have to remember how to wire the programming connections, or worry about mixing up the power pins, RX/TX, or MOSI/MISO.  Plus, I end up with a much neater breadboard and more room for the rest of my project.

    An Arduino-compatible made with Breadboard Helpers

    The picture below is as compact as I think I can manage to breadboard an Arduino; 46 of the 5-position tie points are used, only leaving 14 available on this small breadboard. There’s only room for an 8-pin DIP device. I didn’t watch the clock, but I’d bet it took me the better part of an hour.

    Identical circuit as in the above picture, made with individual components.
    Not much room left on a small breadboard.

    A couple things to note with Breadboard Helpers.  First, if you’re doing ICSP programming, you will need one wire to go from the RST pin on the ICSP board to MCU pin 1, the reset pin (this is the green wire in the first picture above).

    Second, I have two kinds of breadboards.  The larger ones have the holes in the power rails aligned with the holes on the main part of the breadboard.  The smaller breadboards have the holes in the power rails staggered relative to the main part.  Breadboard Helpers have two positions for the power pins, to allow them to be built to work with one type breadboard or the other.

    Breadboard Helpers are also flexible.  Several of the parts can be eliminated if you don’t plan to use them, and can be added later if needed.  Not doing ICSP programming?  Leave the 2x3 header off.  Don’t care about the LED?  Leave it and its resistor off.  If you’re using a resonator that has built-in capacitors, then the crystal loading capacitors aren’t needed of course.  If you don’t have any worries about power supply filtering, the small electrolytic capacitors can be eliminated; however, I do recommend retaining the 100nF bypass capacitors.

    If you’d be interested in Arduino Breadboard Helpers, leave me a comment.  If there’s enough interest, I might put a small run of kits together (soldering required!).

    If you'd like to roll your own, the Eagle files are available on github, and a bill of materials with all the components needed, including the microcontroller and a breadboard, is available on the Mouser web site.  Note that if you order the microcontroller from Mouser, it will need to be programmed with an Arduino bootloader.

    21 July 2011

    Arduino Thermocouple Library

    This is a very simple library that I wrote earlier this year, I've just now added a couple example sketches and some documentation, so that folks might actually stand a chance of figuring it out.

    The library works in conjunction with the standard Arduino SPI library to interface one or more MAX6675 Cold-Junction-Compensated K-Thermocouple-to-Digital Converters from Maxim Integrated Products.

    I've posted the library on github, click the Downloads button to download the library, examples, and ReadMe as a .zip or .tar.gz file.

    Questions, comments, suggestions, gripes, etc., always welcome!

    02 May 2011

    The Evil Arduino

    I can't help but like a place called Evil Mad Science. I picked up a couple of their ATmegaXX8 Target Boards and a couple ATtiny2313 Target Boards with the intention of using them to do ICSP programming. I realized that with the addition of a few common components, the ATmegaXX8 Target Board could do that and also be used as a basic Arduino clone. EMS also has a good price on Zero-Insertion Force (ZIF) sockets which are great if you're swapping the MCUs in and out a lot.

    So this is kind of a simple-minded project and I'd be surprised if it was an original idea, but I thought I'd show how I used EMS' "fine DIY and open source hardware" to make a simple Arduino clone. Just a fun little project that can be tossed together in about an hour.

    On the other hand, a person could just go with EMS' Diavolino kit. At $13, it could well be cheaper than the target board approach, especially if you don't have the incidental components laying around as I did. And the Diavolino also has the Arduino form factor. So it depends what you want. The target board approach has more of a DIY flavor as opposed to a kit.

    Parts list:

    C1,2  18pF ceramic, or as needed to match crystal*
    C3-6  100nF ceramic
    C7    10uF 16V electrolytic
    IC1   ATmega328P
    J1    2x3 ICSP HEADER
    J2    6x1 FTDI HEADER
    LED1  Red garden-variety (Pin 13 LED)
    LED2  Green garden-variety (Power LED)
    Q1    16MHz*
    R1    10K
    R2,3  1K
    S1    SPST MC NO Tact switch
    n/a   ZIF or other 28-pin DIL socket
    n/a   Evil Mad Science ATmegaXX8 Target Board

    *EMS sells a 16MHz Crystal and Capacitor Set, which is what I used, but of course they could also be purchased individually, or a resonator could be used instead.


    Schematic

    Arduino-compatible built on EMS target board

    Action shot ;-)

    28 April 2011

    A "Minimal" Arduino/XBee/Pachube Sensor Network

    One or two people have asked in online forums for code from my sensor network, and while I'm usually happy to share, it's full of a lot of extraneous stuff (RTCs, NTP, displays, thermocouples) that might not be of interest to everyone, but more importantly, that probably only obscures the fundamentals of XBee networking and communicating with Pachube.

    So with that in mind, I cut out the extraneous stuff, and just left the bare essentials: A remote sensor unit which transmits a single reading from a photocell once per minute to a base unit which connects to the internet and forwards the data on to Pachube.

    Bill of materials -- Base unit:
    (1) Arduino Uno, Through-hole or SMD edition
    (1) Arduino Ethernet shield
    (1) XBee ZB low power Zigbee Module, Digi Product ID XB24-Z7CIT-004, XB24-Z7WIT-004, XB24-Z7SIT-004, or XB24-Z7UIT-004 (these differ only in the antenna, they are functionally equivalent)
    (1) Adafruit Industries XBee Adapter
    (1) LED for heartbeat (optional)
    (1) 330-ohm resistor for heartbeat LED (optional)

    XBee configuration:
    • Load the Zigbee Coordinator API firmware (I'm using Version 2170).
    • Set the PAN ID as desired, to match that of the sensor unit(s).
    • Set API mode 2 (AP=2).
    • Set baud rate to 9600.

    Bill of materials -- Remote unit:
    (1) Arduino Uno or similar (Through-hole, SMD edition, Boarduino, etc.)
    (1) XBee ZB low power Zigbee Module, Digi Product ID XB24-Z7CIT-004, XB24-Z7WIT-004, XB24-Z7SIT-004, or XB24-Z7UIT-004.
    (1) Adafruit Industries XBee Adapter
    (1) CdS photocell
    (1) 10K resistor

    XBee configuration is same as above, except:
    • Load the Zigbee Router API firmware (I'm using Version 2370).

    Here are the sketches.  Unzip into the Arduino Sketchbook folder.  Before uploading, be sure to disconnect the XBee from Arduino pin 0.  Also be sure to enter your MAC, IP, and Pachube API key in the base station main module, and your Pachube feed number and the address of your network coordinator XBee in the main module for the remote unit.

    Here is the Pachube feed. Pretty boring, but at least you can see that it does work. Not sure how long I'll leave it running, probably until I need the parts for something else!  Feedback and questions welcome!

    Note that in the following wiring diagrams, the XBees plug into the Adafruit adapter, which in turn plugs into the breadboard. The XBee pins do not (in fact, cannot, spacing is different) connect to the breadboard.  The adapter plugs into the breadboard, this is represented by the 10-pin header below the XBee.

    Wiring the base unit


    Wiring the remote unit

    My base unit

    My remote unit (using a Boarduino)

    08 February 2011

    Easy NiMH discharge curves

    This post is a bit of an aside, or at least it started out that way.  I thought it worth noting though, because it's a good example of how quickly and easily a new Arduino/Pachube application can be put together, once you have some basics in place.

    A friend was having some difficulty with some older NiMH rechargeable batteries (actually AA cells).  He'd charge them up, but when he put them in his camera it would immediately complain that the batteries were low, and it wouldn't turn on.  The batteries seemed OK when checked with a voltmeter, reading 1.4V or a little better (the nominal voltage for NiMH cells is 1.2V).  My friend was aware that batteries are best tested under load, and I gave him a few resistors for that purpose, and he went off to try again.

    In the meantime, I was looking at my recently-completed XBee/Arduino/Pachube lashup (see prior post) and a light went on.

    I wired up two NiMH cells with resistors for loads, connected them to two analog inputs on the Arduino, added a few lines of code to the Arduino sketch, and literally within 10 or 15 minutes I had Pachube collecting the voltage data once per minute (in addition to the temperature data that I was already collecting).  It's taken me a lot longer to write this post than it did to get the thing working in the first place!

    Now I could produce nice discharge curves for two batteries simultaneously.  It was just a matter of popping them into the battery holders, then waiting for 8 or 10 hours while they discharged and Pachube collected the data.  In the end this gives a heck of a lot better picture of what's going on than could have been accomplished with a voltmeter, and with a lot less effort!

    This first chart shows two cells that I had.  The first was relatively new (~8 months old), and the other a few years old, and while I no longer used it in my camera, it still seemed to work OK in my old iRiver MP3 player.  You can see Cell A held 1.2V for six hours or so, but Cell B dropped below 1.2V after about only an hour.  What surprised me is that the curves aren't that different, just shifted down for the older battery.  If you do the math on the mAh capacity, it comes out pretty close!


    The second chart shows two of my friend's cells that wouldn't work in the camera.  Cell C looks similar to my Cell B, but Cell D drops below 1.2V almost immediately, and after an hour, is below 1.1V.  Note the sharp initial drop in voltage.  This leads me to suspect that as these cells age, their internal resistance goes up, while overall capacity may only decline modestly.  This is contrary to my gut feel; when a battery doesn't work I think it's dead, empty, out of capacity.  Actually these older batteries might work OK in devices that aren't terribly voltage-sensitive.  Obviously the cameras watch the voltage pretty closely and let you know about it when it drops only a few tenths of a volt.  But consider the challenge: You need to know you're running low far enough in advance of the knee in the curve, because things go south in a hurry then.  And the camera has to make some sort of assumption about the quality/age of the cells.  Or maybe the camera people are just in cahoots with the battery companies ;-)  A 5-ohm load was used on all cells.

    25 January 2011

    A simple wireless sensor network

    A lot of pieces come together in this project.  It seems to be working well; I'm pretty happy with it.  I'll jump right in and give a high level description of the pieces.

    I started this blog with digital clocks and this project starts with one as the sensor unit.  It consists of a Arduino Pro Mini 328 (check the size of that guy!), a "Chronodot" Real-Time Clock (RTC) module from Macetech based on the Maxim DS3231 chip, and an XBee ZigBee module from Digi International (part no. XB24-Z7WIT-004).  Just for fun and to generate a little more data to collect, I connected a simple Cadmium-Sulfide (CdS) photocell to one of the Arduino's A/D inputs to measure light intensity wherever the sensor unit happens to be.  The readout is a 16x2 LCD from Sparkfun.  See the picture below.

    Sensor Unit.  L to R: Arduino, RTC, XBee, Photocell and XBee status LEDs, power supply.

    A few words on the parts.  The Arduino Pro Mini has the same ATmega328 microprocessor and basic specs as the Arduino Uno, but is much smaller!  I soldered on headers so it would plug into a breadboard.  What it doesn't have is a power supply or a USB interface.  Both Sparkfun and Adafruit make nice little breadboard power supplies that work great and accept the same wall wart input as the Uno.  As for the USB connection, you'll need an FTDI breakout board (about the size of a small postage stamp) and FTDI drivers to do the interface.  Once you have that (and it's pretty easy), the USB interface works pretty much the same as the Uno.

    The DS3231 RTC is pretty cool too.  If you keep it between freezing and about 100°F, it will keep time within two parts per million, which is about a minute per year.  It accomplishes this by monitoring its own temperature (a major cause of oscillator drift) and switching capacitors in and out of the crystal oscillator circuit to trim the frequency.  The crystal itself is on-chip which also helps accuracy.  A very sweet piece of engineering.  In addition to the date and time, we can also read the temperature from it (in °C to the nearest quarter degree).

    Last we have the XBee module, which uses the ZigBee specification, based on the IEEE 802.15.4 standard.  These modules are low power and don't offer terribly high bandwidth, which is just fine for sensor networks which tend to send very small amounts of data at any one time.  The really neat thing is that XBee modules form themselves (with just about zero help from you!) into self-healing mesh networks.  They can be configured either as network coordinators, routers, or end devices.  Every network must have exactly one coordinator.  Routers can do anything an end device can, plus forward messages between devices.  End devices cannot route traffic, and must do all their business through a parent node which is either a coordinator or a router.  Additionally, end devices can sleep in a low-power mode which would be very good for battery-powered remote sensors.  If an end device is sleeping, its parent node will store traffic for it.  The XBee in my sensor module is configured as a router.

    Now we come to what I call the "base" unit.  This consists of an Arduino Uno, with an Ethernet shield added on top and connected to my internet router.  Also we have an XBee module, configured as the network coordinator, and a seven-segment LED display.

    Base unit. Arduino and Ethernet shield at top. XBee, status LEDs, temperature display on breadboard.


    The whole thing works like this.  Once a minute, the sensor unit sends the temperature and light intensity data to the base unit.  The base unit sends the data to Pachube (click here to go to the Pachube feed for this project) and displays the temperature on the LED display.  We can then download the data from Pachube, or have it create charts like below.  These are live charts and will refresh every few minutes (not sure how often exactly, haven't found the spec on Pachube yet).  So if you refresh this page, you will see current data, assuming that a cat hasn't chewed through any wires on my end in the meantime.


    DS18B20 Temperature Sensor


    It would be straightforward to add additional sensor units to this project.  One idea I have in mind is to measure the temperature of my wood stove with a thermocouple.  Maybe send a text message to my mobile phone if it got over a certain temperature.